Lenticular imaging prepress process
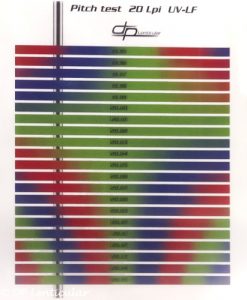
Pitch test
Before interlacing it is necessary to determine the exact size of the lens of the lenticular material, sheet or roll. This is what we call the pitch test.
We will distinguish the visual pitch and the mechanical (or absolute) pitch.
To determine the pitch of the lenticular sheet, it is necessary to carry out a pitch test.
We provide this test file to our customers (free).
This file will be used to output a film or a plate. Digital printers will print this file direct to the lens or on another subtsrate.

It is possible to determine the pitch by placing a lenticular clear sheet on the plate (or the film) and look at the viewing distance of the final image. We strongly recommend to print the pitch test so that you will determine the exact value. More information about pitch test in our FAQ, just click here.

101.5 is totally black or white.
One line will be totally black or invisible, it will be your visual pitch.
The result will be more precise if you print the pitch test on the lenticular sheets.
If, for example, the test shows that the optical pitch is 75,48 LPI, you will thus interlace 16 images in
The mechanical pitch will be determined using a magnifying glass.
On digital equipment we’ll propose an RGB pitch test as it is more precise.

We are emailing the pitch tests files to our customers.
What do I need to create lenticular images?
Computer
The lenticular files can become enormous, and the imposition, if it is not made in the RIP is very heavy for a workstation.
So you’ll need a powerful computer!
Software:
- Adobe Photoshop (see: how to interlace in Photoshop)
- Quark
- Adobe After Effects
- Adobe InDesign
- ArtPro
- Lenticular Software
 A minimum of 300 lines per inch is essential for an acceptable quality, a higher quality can be obtained with 450-500 lines. Adapt linescreen to a value mathematically compatible with the pitch of the lens will produce a better result, this can also reduce or eliminate the banding caused by interpolation of the image when creating dots.
Specific screen angles must be used to avoid moiré. We can provide you this information.
The CTP (or CTF) must have a resolution of at least 2400 DPI, a higher resolution will give a better result. The majority of the current CTP have a capacity between 2400 to 4000 DPI, some can achieve higher resolution, they are mainly designed for safety printing. MicroFlex will require a very high resolution !
In the same way, when using high resolutions, the proper laser resolution intensity values should be established and setup, also exposure curves created, to produce linear reproduction of dot values.
Proofing
It is possible to test the effects using a high resolution inkjet printer (min 1440 PPI) but it will be necessary to adjust the pitch to this device as the pitch will be different from your CTP. Also the number of frames and the dot size will be different.
So this system would work only to test the effect but the result will be totally different than the printed piece.
Some current CTP providers (Fuji) are proposing a direct proofing system that will give a result matching the final print.
New: we now propose a crystal clear double side adhesive to laminate your proofs. Order here
Don’t hesitate to contact us if you have any question about the Lenticular imaging prepress process.


